How to make a real smooth software tutorial with Snapz pro
We use Snapz pro (by Ambrosia software) to make the software tutorials on our website. We did quite a lot of experimenting to get to the result we wanted. So I thought it might be usefull to some of you to round up our findings.
Criteria: We made the movies to put them on our website so we wanted them to have a small filesize and yet, they had to be detailed enough to have the text on the screen legible.
Issues: The biggest issue to us was that we move the mousepointer all over the screen when we use/install our software. So we had to be able to capture almost all of the screen's real estate.
METHOD 1 - failed: Our first reaction was to capture the entire screen. This (of course) resulted in a huge file. So we scaled it down what made all the text blurry and useless.
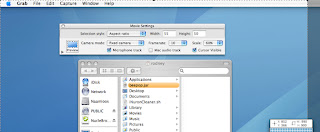
METHOD 2 - getting better: So we started experimenting with the 'smooth pan' option. With this setting the area that is captured follows your mousepointer in a smooth way.
We set the captured area to 500 px in width (about the width of our wizard) and scaled it down 60% to get a 300px movie. We found out 60% of the real size is about the smallest we could go to keep the text legible and have an acceptable filesize.
But.. we were not completely satisfied; because we had to move the mousepointer a lot the screen was moving constantely. You got seasick watching them. Some of the movies on our website are made using this technique, can you spot them? ..
METHOD 3 - that's more like it: So we came up with this technique. First we capture as much of the screen as possible with an aspect ration of 55 x 50. We scale the movie down to 60%. Then we save this movie and play it in quicktime.
In the next step we play the quicktime movie and capture it again. This time with this settings:
- w:300px h:280px
- scale 100%
- cursor invisible.
- smooth pan
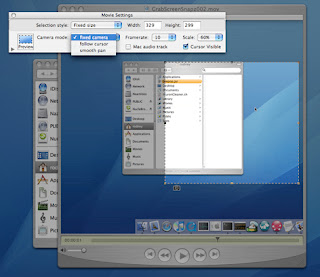
Now start the capture and hit enter right after you start to make your quicktime movie play. Now you can mouve the captured screen around and follow the mousepointer when you want it. Just make sure you don't move the captured area outside of the quicktime movie or the borders will show.
Filesize: To keep the filesize small we use these video settings:
- 10 frames per second
- no keyframes (this makes a huge difference)
- best depth
- medium quality
Secret ingredient: After the movie is published, we open and save it with Amateur. This freeware quicktime clone makes the filesize a lot smaller: 66.4 MB in quicktime to 5.5 MB in amateur. The loss of quality is really acceptable.
We were quite happy with the result. Compare this movie shot with smooth pan to this one made with the technique I just explained and judge for yourself.
So a little round-up ([dutch]wat hebben we geleerd vandaag?[/dutch]. The trick is to capture the screen at fullscreen, scale it down, and then capture the movie again moving the camera were you want it to be. then compress it with amateur.
note:this is just the way we do it, this method works for us. Know how to do it better ? Just post a comment :-)
regards,
Maarten
Criteria: We made the movies to put them on our website so we wanted them to have a small filesize and yet, they had to be detailed enough to have the text on the screen legible.
Issues: The biggest issue to us was that we move the mousepointer all over the screen when we use/install our software. So we had to be able to capture almost all of the screen's real estate.
METHOD 1 - failed: Our first reaction was to capture the entire screen. This (of course) resulted in a huge file. So we scaled it down what made all the text blurry and useless.
METHOD 2 - getting better: So we started experimenting with the 'smooth pan' option. With this setting the area that is captured follows your mousepointer in a smooth way.
We set the captured area to 500 px in width (about the width of our wizard) and scaled it down 60% to get a 300px movie. We found out 60% of the real size is about the smallest we could go to keep the text legible and have an acceptable filesize.
But.. we were not completely satisfied; because we had to move the mousepointer a lot the screen was moving constantely. You got seasick watching them. Some of the movies on our website are made using this technique, can you spot them? ..
METHOD 3 - that's more like it: So we came up with this technique. First we capture as much of the screen as possible with an aspect ration of 55 x 50. We scale the movie down to 60%. Then we save this movie and play it in quicktime.

In the next step we play the quicktime movie and capture it again. This time with this settings:
- w:300px h:280px
- scale 100%
- cursor invisible.
- smooth pan

Now start the capture and hit enter right after you start to make your quicktime movie play. Now you can mouve the captured screen around and follow the mousepointer when you want it. Just make sure you don't move the captured area outside of the quicktime movie or the borders will show.
Filesize: To keep the filesize small we use these video settings:
- 10 frames per second
- no keyframes (this makes a huge difference)
- best depth
- medium quality
Secret ingredient: After the movie is published, we open and save it with Amateur. This freeware quicktime clone makes the filesize a lot smaller: 66.4 MB in quicktime to 5.5 MB in amateur. The loss of quality is really acceptable.
We were quite happy with the result. Compare this movie shot with smooth pan to this one made with the technique I just explained and judge for yourself.
So a little round-up ([dutch]wat hebben we geleerd vandaag?[/dutch]. The trick is to capture the screen at fullscreen, scale it down, and then capture the movie again moving the camera were you want it to be. then compress it with amateur.
note:this is just the way we do it, this method works for us. Know how to do it better ? Just post a comment :-)
regards,
Maarten
posted by iNuron at 10:19 AM
![]()

0 Comments:
Post a Comment
<< Home